
Last updated on December 13th, 2023
Hello, Mazda owners! You are in the right place if you are tired of looking at a dull, scratched, etched, or hazy display on your car’s infotainment system. I am excited to share my step-by-step guide on how to restore your Mazda CX5 Display to its former glory.
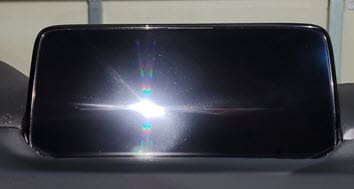
A clear and bright display enhances the overall look of your car’s interior, improves visibility, and enhances resale value. It makes navigating through menus, selecting songs, and using navigation features easier and safer. Undoubtedly, it will make it look new again and save you a ton of money over replacing the unit.
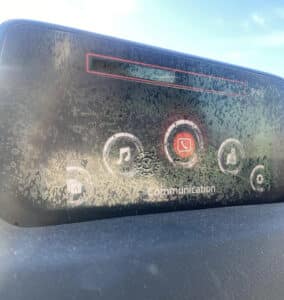
Over time, the display can accumulate scratches, scuffs, and etching. Those scratches, scuffs, and other marks reduce its clarity and performance.
Another contributor to the etching is one “who shall remain unnamed” accidentally or inadvertently using an ammonia-based cleaning product not designed to clean the infotainment display head. (Apologies for my passive-aggressive tone. It took me a month to work up the nerve, investigate, and restore the infotainment display on our Mazda 😒.)
Whether you are a DIY enthusiast or want to save money on costly repairs, this guide will help you achieve a showroom-worthy display with minimal effort and expense. I will explain the tools, products, and materials I used to restore my Mazda CX5’s display and the step-by-step procedure.
What are you waiting for? Get ready to transform your Mazda CX5 display and enjoy the benefits of a crystal-clear infotainment system again. Follow this guide, How to Restore Your Mazda CX5 Display, and you’ll be amazed at the difference a little polishing and buffing can make!
Disclaimer about Restoring the Mazda CX5 Display Unit
Disclaimer: It is important to note that following this procedure requires a delicate touch, specialized tools, products, and expertise. Attempting to repair the display on your own may further damage the system unit. Also, it can void your vehicle’s warranty.
I highly recommend seeking professional assistance from a certified Mazda technician to ensure the repair is done correctly and safely. (Unfortunately, using a certified Mazda technician will most likely have you replacing the complete Mazda Infotainment Display Head.)
Detail Your Rides is in no way responsible for injury or further damage from following this procedure, but if you follow the steps, you can restore the display unit.
About the Mazda Infotainment Display Head Unit
I have posted about two of the Mazda cars that we, as a family, own on my website in the past. Those articles were always regarding detailing the exterior and interior of the vehicles. No one could have imagined I would have to extend my detailing knowledge to polish and buff the infotainment display unit on our Mazda CX5. You can see my wife’s Mazda CX5 here at Detail Your Rides.
My daughter owns a 2022 Mazda CX5 and our old 2014 Mazda 3. All three cars include this style of display unit for the navigational and entertainment systems. Subsequently, the procedure I am preparing to outline should work on those model years. From the information about the display online, my family is one of many who have run into scratching, etching, bubbling, and cleaning problems discussed earlier in this post.
Consequently, following the steps using the recommended materials saves this expensive repair between $250.00 and $1500.00. Who doesn’t like those kinds of savings (especially in this economy)?
When I was investigating the cost of repairing or replacing the infotainment display unit, the average labor rate from Mazda dealers ran $160.00 an hour plus tax. Repairing it with the kit or replacing the unit would take one hour.
I found that the infotainment display head can have many other problems. My post will tell you how to restore your Mazda CX5 display to the original lustrous and soft-to-the-touch shine of when it was a new car. Here is a simple list of the problems below.
Problems Necessitating Mazda’s Infotainment System Repair Kit Overhaul or Replacement
- A faulty Connectivity Master Unit (CMU) can cause various problems because this unit controls all of the vehicle’s electronics.
- Corrupt Navigation SD Card will cause the screen to go blank at times either because the card is corrupted or poorly oxidized or corroded contact point.
- Software Development Bugs can cause miscommunication between software and desired effects since the software manages the system.
- Ghost touching occurs when the system fails to recognize a human touching the screen or applies some other command (unintended or unexpected input actions on the display unit.)
- Other Electrical issues like loose or broken wiring are often the culprit for many problems when discussing the display unit.
If you have any problems, you should consult an ASE repair facility where they can service or replace the infotainment display unit. I mentioned a kit that is available for around $250.00, and here is that link, Mazda Genuine Parts Online.
Affiliate Marketing Disclaimer: I am an affiliate marketer with links to online retailers on my website. When people read what I have written about a particular product, click on those links, and buy something from those links, I earn a small commission from the retailer at no extra cost to the buyer.
Materials Essential for Correcting Your Mazda’s Display
Here is a list of materials I used to polish, buff, clean, and restore the infotainment control display unit in my 2019 Mazda CX5. It will not be necessary to use the exact brand of tools or materials I used, but I succeeded with them, and my wife was pleased with the results. However, it is essential to note that you need to use ammonia-free chemicals and preferably water-based products.
Tools, Materials, & Chemicals I Used to Restore the Mazda CX5 Display:
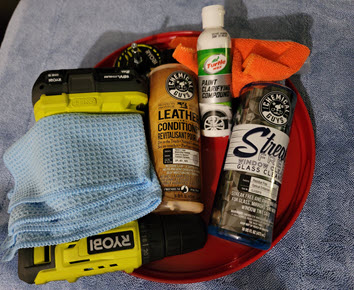
- One battery-operated drill that functions at less than 1800 RPM and has a 1/4″ hex shank. (I used a Ryobi One 18V with a 2.5-Amp battery.) If you have a mini or micro battery-operated orbital polisher, you must ensure you operate it at less than 3500 RPM. My drill manufacturer stated that the drill operated at 1750 RPM, which was fast enough.
- Ryobi four-piece Polishing and buffing Drill Set that, at the time of this post, cost $17.00. (The kit includes the items listed below:)
- (1) – 3″ Wool Compound Cutting Pad: For aggressively removing surface scratches, defects, & oxidation.
- (1) – 3″ Yellow Correcting Pad: Use compounds with medium to low cutting levels to remove surface scratches and defects.
- (1) – 3″ Black Finishing Pad: The final polishing steps. Great for applying waxes, sealants, & glazes.
- (1) – 3″ Hook and Loop Backing Plate used with the supplied 1/4″ Hex Shank Backer. (**Note: when the backing plate and hex shank backer are connected to the drill, you must use the plate so its spinning motion goes clockwise; otherwise, the bit will spin out of the drill.)
- Two small microfiber towels, one for cleaning the unit beforehand and the other for hand polishing and buffing
- Chemical Guys blue waffle-weave towel for cleaning the windshield from polish splattering.
- Chemical Guys Leather Conditioner to buff the dashboard after polish splatters.
- Chemical Guys Streak-Free and Ammonia-Free glass cleaner to clean the display and windshield afterward.
- Turtle Wax Paint Clarifying Compound (It might be hard to find as it came in a scratch repair kit I bought years ago.)
- A single pair of nitrile rubber gloves.
Alternate Materials to Restore Your Mazda CX5 Display

You can use Chemical Guys V38 Polish instead of Turtle Wax Paint Clarifying Compound. This would have been my first choice had I not wanted to use up the Turtle wax before the shelf life expired. I found it most accessible and less cleanup using tape and paper around the display head unit to avoid product sling.
You can use the Total Interior Cleaner & Protectant from the Chemical Guys if you do not have leather. I included an image for reference, so you can easily buy a bottle for future detailing. The product is a total interior cleaner and states that it is safe to use on all surfaces, including the infotainment display unit’s LCD.


Steps for Fixing the Mazda’s Etched Display
As mentioned before, by polishing and buffing the lens of the display, you will save yourself a lot of money. So here is the part of the post that puts everything together…drum roll, please! The steps to polish and buff the infotainment display on your Mazda CX5 are as follows:
- Gather all the materials discussed in the list above or their equivalents.
- Put on your nitrile rubber gloves.
- First, clean the unit with a small microfiber towel & ammonia-free automotive display cleaning solvent or water.
- Remove any residual chemicals, oils, water, or fingerprints.
- Tape off the surrounding area of the display so that the only thing that is uncovered is the black plastic front lens.
- Apply a few drops of Turtle Wax Clarifying Compound (or the other recommendation – Chemical Guys V38) to another small microfiber towel.
- Gently wipe the screen in a small circular motion.
If the steps above do not remove the scratches, etching, or hazing after a minute from the display, proceed to the next steps.
Next, if the above steps do not restore the surface of the display.
- Grab your battery-operated drill.
- Put on your nitrile gloves if you removed them in the previous steps.
- Take your 3″ Hook and Loop Backing Plate with the supplied 1/4″ Hex Shank Backer.
- Apply the hook and loop-backed 3″ Black Finishing Pad to the 3″ Hook and Loop Backing Plate used with the supplied 1/4″ Hex Shank Backer.
- Press them firmly so they don’t slip, and insert the assembly into your drill.
- Tighten the drill chuck.
- Add three tiny drops of the Turtle Wax clarifying compound or the Chemical Guys V38 to the pad.
- Spread them with your finger to cover the pad.
- Press the pad directly onto the display as an extension of the drill.
- Turn the drill at a low and slow speed. (The drill head with the pad must be spinning clockwise.)
- Start moving the pad on the drill slowly across the screen’s surface in 30-second intervals, checking your progress as you go along. (Do not let the pad and drill sit in one spot for any period.)
- Remove any leftover residual compound if the display is restored.
- Clean the display with a clean microfiber towel.
- If not, return to Step # 3 in this section and change your pad to the 3″ Yellow Correcting Pad.
- Repeat steps # 3 through #12 until you reach the desired results, or use your last 3″ Wool Compound Cutting Pad.
To sum it all up,
To sum it all up, restoring your Mazda CX5 Display is essential to improve your car’s overall look, enhance visibility, and increase its resale value. With my step-by-step guide, you can achieve a showroom-worthy display with minimal effort and expense.
By following the tips, you will be amazed at the difference a little polishing and buffing can make.

It is crucial to remember that attempting to repair the display on your own may further damage the system unit. If your car is still under warranty, it will void it. I highly recommend seeking professional assistance from a certified Mazda technician to ensure the repair is done correctly and safely.
Using the recommended materials saves you a lot of money, ranging from $250.00 to $1,500.00. In contrast, replacing or repairing the unit with a kit would take one hour, costing you $160.00 an hour plus tax on average.
Lastly, if you encounter any problems, you should consult an ASE repair facility. They can service or replace the infotainment display unit. Remember to use ammonia-free chemicals and preferably water-based products to restore your Mazda CX5 display.
Have you tried restoring your Mazda CX5 display? What was your experience, and do you have any feedback or suggestions? Please share your thoughts in the comments section below. Also, remember to share this post with other friends and Mazda owners.
Thank you for visiting my website and reading my materials.
Regards, Matt

That’s really awesome that you are able to do that.
Thank you for your comment, Camron. Please keep coming back and let me know if you have questions.
Thank you, Matt
From the one “who shall remain unnamed” – Thank you, Thank you, Thank you!!
I really thought I was going to have to replace my Mazda CX5 Infotainment display and maybe even the whole Infotainment system. When giving my car a quick wipe down, I should have consulted the expert at Detail Your Rides, instead I made a rookie mistake. I swiped that screen with a cloth containing an ammonia based cleaner and nearly destroyed it.
I didn’t realize how much I had come to rely on the screen display for not only radio tuning, music and phones calls, but also for the backup camera, parking and navigation. It was nearly impossible to see anything on the screen, especially in the sunlight.
Now it truly looks better than ever, the screen is smooth and clear – you are amazing!
You are welcome. Thank you for allowing me to restore it for you. It turned out well, and we saved money over replacing the unit.
I hope you have a wonderful day!
Regards, Matt